It’s part-3 in series of WCF Hosting Tutorials and we are going to implement that how we can host a WCF Service in IIS (version 5 or 6)? We already have implemented the following in series:
Microsoft introduced WCF (Windows Communication Foundation) in .NET Framework v 3.0 with lots of exciting features but most exciting feature among all was, How it’s different from ASMX services or ASP.NET Web Services? or What’ additional things it provide as compared to ASMX services?
Primary difference is that ASMX or ASP.NET web service is designed to send and receive messages using SOAP over HTTP only. While WCF can exchange messages using any format (SOAP is default) over any transport protocol (HTTP, TCP/IP, MSMQ, NamedPipes etc). Another WCF Tutorial has detailed discussion on WCF Vs ASMX here.
So, if we are hosting a WCF Service in IIS (version 5 or 6), only HTTP option is available as transport protocol. In later versions of IIS (Internet Information Services), we an use any other protocol (TCP/IP, MSMQ, NamedPipes etc.) as transport protocol.
::::: Practical Guide to WCF RESTful Service :::::
As we already know that in order to host a WCF Service, we need a managed process. In case of IIS (Internet Information Services), it provides the host process and launch the process as the first request reaches server.
Now let’s first create a WCF service and later host in IIS.
Create a StudentService Class Library
We have already created a StudentService Class Library project while implementing WCF Self Hosting Tutorial. In order to make things consistent here, we will use the same service, so please go through step 1 of that WCF Tutorial for creating a WCF Service.
WCF Hosting in IIS
So in order to host our WCF Service in IIS, follow the simple step by step approach.
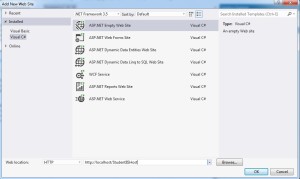
1. Add a Website to our Solution. Choose “ASP.NET Empty Web Site” template. For Web location, choose “HTTP” instead of “File System”, provide the path and press “OK” button.
2. Add Reference of StudentService project to our WebSite i.e. StudentIISHost.
3. Add Reference of System.ServiceModel to website.
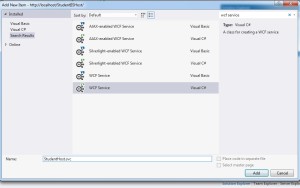
4. Add a new .svc file to our website project as.
In above code, we are pointing Service to StudentService in ServiceHost.
5. Updated configuration for System.ServiceModel in web.config will be as follows:
<behaviors>
<serviceBehaviors>
<behavior name=”StudentServiceBehavior”>
<serviceMetadata httpGetEnabled=”true”/>
<serviceDebug includeExceptionDetailInFaults=”false”/>
</behavior>
</serviceBehaviors>
</behaviors>
<services>
<service behaviorConfiguration=”StudentServiceBehavior”
name=”StudentService.StudentService”>
<endpoint address=”http://localhost/StudentIISHost/MyStudentHost.svc”
binding=”wsHttpBinding”
<identity>
<dns value=”localhost”/>
</identity>
</endpoint>
<endpoint address=”mex”
</service>
</services>
</system.serviceModel>
6. Access the hosted WCF Service i.e. StudentService using following path.

Hopefully, this WCF Tutorial will help to understand implementation for hosting a WCF Service in IIS (Internet Information Service).
Other Related Articles:
- 5 simple steps to create your first WCF RESTful Service
- WCF Vs ASMX Service
- MVC3 Vs MVC4 Vs MVC5
- Consuming a WCF RESTful service using jQuery
- Post JSON data to WCF RESTful Service using jQuery
- Difference betweeen ASP.NET WebForms and ASP.NET MVC
- 3 ways to generate proxy for WCF Service
Top 10 Interview Questions and Answers Series:
- Top 10 WCF Interview Questions
- Comprehensive Series of WCF Interview Questions
- Top 10 HTML5 Interview Questions
- Top 10 ASP.NET Interview Questions
- Comprehensive Series of ASP.NET Interview Questions
- Top 10 ASP.NET MVC Interview Questions
- Top 10 ASP.NET Web API Interview Questions
- Top 10 ASP.NET AJAX Interview Questions


